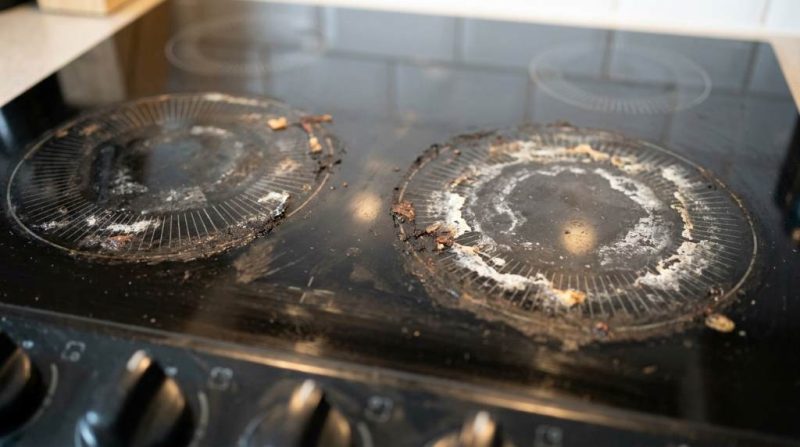
Saucepan vs Saucier: Which One Actually Best?

Saucepan vs saucier side by side comparison on a kitchen countertop

If you have ever stood in a cookware aisle feeling confused, you are not alone. The debate around saucepan vs saucier comes up more than you might expect, even among experienced home cooks. According to a 2023 survey by the Specialty Food Association, over 60% of American home cooks admit they own cookware they do not fully understand how to use. Choosing the right pan can seriously upgrade your cooking results, reduce frustration, and save you money in the long run. This guide breaks down every key difference so you can finally make the right call.Continue reading →

Thermal Carafe vs Glass Carafe: Which One Best?

Thermal carafe vs glass carafe side by side comparison on kitchen counter


Choosing between a thermal carafe vs glass carafe is one of those decisions that feels small but genuinely shapes your daily coffee experience. According to the Specialty Coffee Association, over 70% of Americans drink coffee every day, making the right carafe a real quality-of-life choice. Studies also show that coffee kept above 175°F for more than 20 minutes loses significant flavor quality. Understanding which carafe type fits your lifestyle can save you money, frustration, and a lot of lukewarm coffee. This guide breaks down every key difference so you can decide with confidence.Continue reading →

Can You Put Aluminum Foil in an Air Fryer?

Person placing aluminum foil in an air fryer basket before adding chicken wings

Air fryers have become one of the most popular kitchen appliances in American homes, with over 40% of U.S. households owning one as of recent surveys. Many home cooks wonder: can you put aluminum foil in an air fryer safely? Studies show that improper use of foil in air fryers is one of the top reasons for appliance damage and uneven cooking results. This guide answers every question you have about using aluminum foil in your air fryer, so you can cook smarter, safer, and with better results every single time.Continue reading →

Stainless Steel vs Nonstick Pans

Stainless steel pan and nonstick pan placed side by side on a kitchen counter

Choosing between stainless steel vs nonstick pans is one of the most common dilemmas in any kitchen. According to a 2023 survey by the Cookware Manufacturers Association, over 70% of American households own at least one nonstick pan, yet professional chefs overwhelmingly prefer stainless steel. Both options bring real strengths to the table, and picking the wrong one for a task can ruin an otherwise perfect meal. Understanding their differences helps you cook smarter, save money, and get better results every single time.Continue reading →

How to Mince Garlic Without a Press: Simple Techniques

Person mincing fresh garlic cloves on a wooden cutting board with a chef's knife

Garlic is one of the most used ingredients in American kitchens, appearing in over 90% of savory recipes worldwide. Yet many home cooks struggle with mincing it properly, especially without a garlic press. Learning how to mince garlic without a press saves you money, reduces kitchen clutter, and gives you better control over texture and flavor. Whether you are making pasta, stir-fry, or roasted vegetables, freshly minced garlic elevates every dish. This guide walks you through every reliable method so you can mince like a pro using tools you already own.Continue reading →

How to Clean a Burnt Stainless Steel Pan

Step-by-step process of cleaning a burnt stainless steel pan with baking soda and vinegar on a kitchen counter

Every home cook has faced a pan that looks beyond saving. According to a survey by the American Cleaning Institute, nearly 68% of households struggle with stubborn burnt residue on cookware at least once a month. Learning how to clean a burnt stainless steel pan not only saves your cookware but also extends its lifespan significantly. Stainless steel is durable, but burnt food can make it look ruined. The good news is that with the right techniques, you can restore your pan to a near-original shine without spending a dime on new cookware.

Why Stainless Steel Pans Burn So Easily

Stainless steel conducts heat unevenly, which makes certain spots hotter than others. When you walk away from the stove or forget to stir, food sticks and burns onto the surface. Unlike non-stick pans, stainless steel has a porous surface that grips burnt residue tightly. Understanding this helps you choose the right cleaning method. Fortunately, the same durability that makes stainless steel burn-prone also makes it highly resistant to harsh cleaning treatments.

What You Should Know Before You Start Cleaning

Hand scrubbing a stainless steel pan with a non-scratch pad and baking soda paste

Before jumping into scrubbing, always let the pan cool down completely. Pouring cold water into a hot pan can warp the metal due to thermal shock. Additionally, avoid using steel wool right away, as it can scratch the surface permanently. Gather your cleaning supplies first so you can work efficiently. The tools you need are likely already sitting in your kitchen cabinet.

Supplies You Will Need

  • Baking soda
  • White vinegar
  • Dish soap
  • A wooden spoon or silicone spatula
  • A non-scratch scrubbing pad
  • Lemon (optional)
  • Cream of tartar (optional)
  • Bar Keepers Friend (optional)

Method 1: The Boiling Water and Dish Soap Technique

This is the simplest first step for lightly burnt pans. Fill the pan with enough water to cover the burnt area, then add two drops of dish soap. Place the pan on the stove and bring the water to a gentle boil for five to ten minutes. The heat loosens the burnt layer from the bottom. After boiling, let it cool slightly, then scrape gently with a wooden spoon to lift the residue.

Method 2: Baking Soda and Vinegar Power Combo

This method works brilliantly for moderate to heavy burns. First, pour a thin layer of white vinegar into the pan and heat it briefly on the stove. Then remove the pan from heat and add two tablespoons of baking soda. The mixture will fizz vigorously, which is the chemical reaction breaking down the burnt residue. Let it sit for fifteen minutes, then scrub with a non-scratch pad in circular motions.

Why This Combination Works So Well

Vinegar is acidic and breaks down mineral deposits and burnt sugars effectively. Baking soda is mildly abrasive and alkaline, which neutralizes odors and lifts grease. Together, they create a powerful scrubbing paste without damaging the steel surface. This duo is also completely non-toxic and safe for food contact surfaces. Many professional kitchen staff rely on this exact combination daily.

Method 3: Baking Soda Paste Scrub

Sometimes a targeted paste works better than a liquid soak. Mix three tablespoons of baking soda with just enough water to form a thick paste. Apply it directly to the burnt area and let it sit for at least thirty minutes. Then scrub firmly but carefully using a non-scratch pad. Rinse thoroughly with warm water, and repeat if needed for stubborn spots.

Method 4: Cream of Tartar Method for Deep Burns

Cream of tartar is an underrated powerhouse for tackling severe burns. Combine two tablespoons of cream of tartar with one cup of water inside the pan. Bring the solution to a boil and let it simmer for ten minutes. The tartaric acid targets even the most deeply embedded residue. After cooling, scrub the pan and rinse well with warm soapy water.

Method 5: Using Bar Keepers Friend for Tough Cases

Bar Keepers Friend is a popular commercial cleaner that works exceptionally well on stainless steel. Sprinkle a small amount directly onto the wet pan surface. Use a damp non-scratch pad to scrub in the direction of the steel’s grain. This product contains oxalic acid, which dissolves rust, tarnish, and burnt residue effectively. Always rinse thoroughly after use to remove any chemical residue.

Important Safety Tips When Using Commercial Cleaners

Never mix Bar Keepers Friend with bleach or ammonia-based cleaners. Always wear rubber gloves to protect your hands during scrubbing. Rinse the pan at least twice to ensure no cleaner remains on the surface. Keep the cleaner away from children and store it in a cool, dry place. Using it occasionally rather than regularly helps protect the pan’s finish over time.

How to Clean a Burnt Stainless Steel Pan With Lemon and Salt

This natural method is perfect when you prefer chemical-free cleaning. Cut a lemon in half and dip the cut side into coarse salt. Rub it directly over the burnt area using firm, circular pressure. The citric acid in the lemon combines with the abrasive salt to lift burnt residue gently. This method also leaves your pan smelling fresh and clean afterward.

How to Prevent Your Stainless Steel Pan from Burning Again

Prevention is always easier than cleaning after the fact. Always preheat the pan properly before adding oil or food to the surface. Use medium heat settings rather than cranking up the burner to high. Add a small amount of butter or oil before placing food in the pan. Stirring food frequently during cooking significantly reduces the chance of burning and sticking.

Best Cooking Practices for Stainless Steel

  • Preheat on medium heat for two minutes before adding oil
  • Use enough fat to coat the entire cooking surface
  • Avoid overcrowding the pan with too much food at once
  • Deglaze the pan immediately after cooking to lift any residue
  • Always wash the pan promptly after it cools down

Common Mistakes People Make When Cleaning Burnt Pans

Many people make the mistake of using steel wool, which permanently scratches the surface. Others try to scrub while the pan is still hot, which can warp the base. Some people skip the soaking step and go straight to aggressive scrubbing, which rarely works well. Using bleach-based cleaners can actually discolor stainless steel permanently. Therefore, sticking to the methods above gives you the best results with the least risk.

How to Restore Shine After Deep Cleaning

Once you remove the burnt residue, your pan may still look dull or discolored. Rub a small amount of olive oil onto the surface with a soft cloth to restore its luster. For rainbow discoloration caused by heat, white vinegar applied with a cloth works perfectly. Rinse and dry the pan completely to prevent water spots from forming. Consistent care after each use keeps your stainless steel looking polished and professional.

Conclusion: Save Your Pan and Skip the Stress

Now that you know exactly how to clean a burnt stainless steel pan, there is no reason to throw away a perfectly good piece of cookware. Whether you use baking soda, vinegar, lemon, or a commercial cleaner, each method delivers real, proven results. Start with the gentlest option and work your way up if needed. Share these tips with a friend who has struggled with the same problem. Try one of these methods today and give your pan a second life it truly deserves.

Frequently Asked Questions

Can I use steel wool to clean a burnt stainless steel pan?

No, steel wool scratches the surface permanently and should be replaced with a non-scratch scrubbing pad.

How long should I soak a burnt stainless steel pan?

Soaking for at least fifteen to thirty minutes loosens most burnt residue and makes scrubbing much easier.

Is it safe to boil vinegar in a stainless steel pan?

Yes, boiling white vinegar in stainless steel is completely safe and actually helps dissolve burnt food and mineral deposits.

Will baking soda scratch my stainless steel pan?

No, baking soda is a mild abrasive that is gentle enough to clean stainless steel without causing surface scratches.

Can a heavily burnt stainless steel pan be fully restored?

Yes, using the baking soda and vinegar method or Bar Keepers Friend can restore even heavily burnt pans to near-original condition.

The Best Way to Store Pots and Pans

Best way to store pots and pans using a ceiling-mounted pot rack in a modern kitchen

Most homeowners underestimate how much kitchen storage impacts daily cooking habits. In fact, studies show that Americans spend an average of 30 minutes per week just searching for cookware. The best way to store pots and pans not only saves time but also protects your cookware investment. A well-organized kitchen boosts cooking confidence and reduces frustration significantly. Choosing the right storage method can extend the lifespan of your pots and pans by several years.Continue reading →